Kielbasa and Pierogi Bake
Introduction
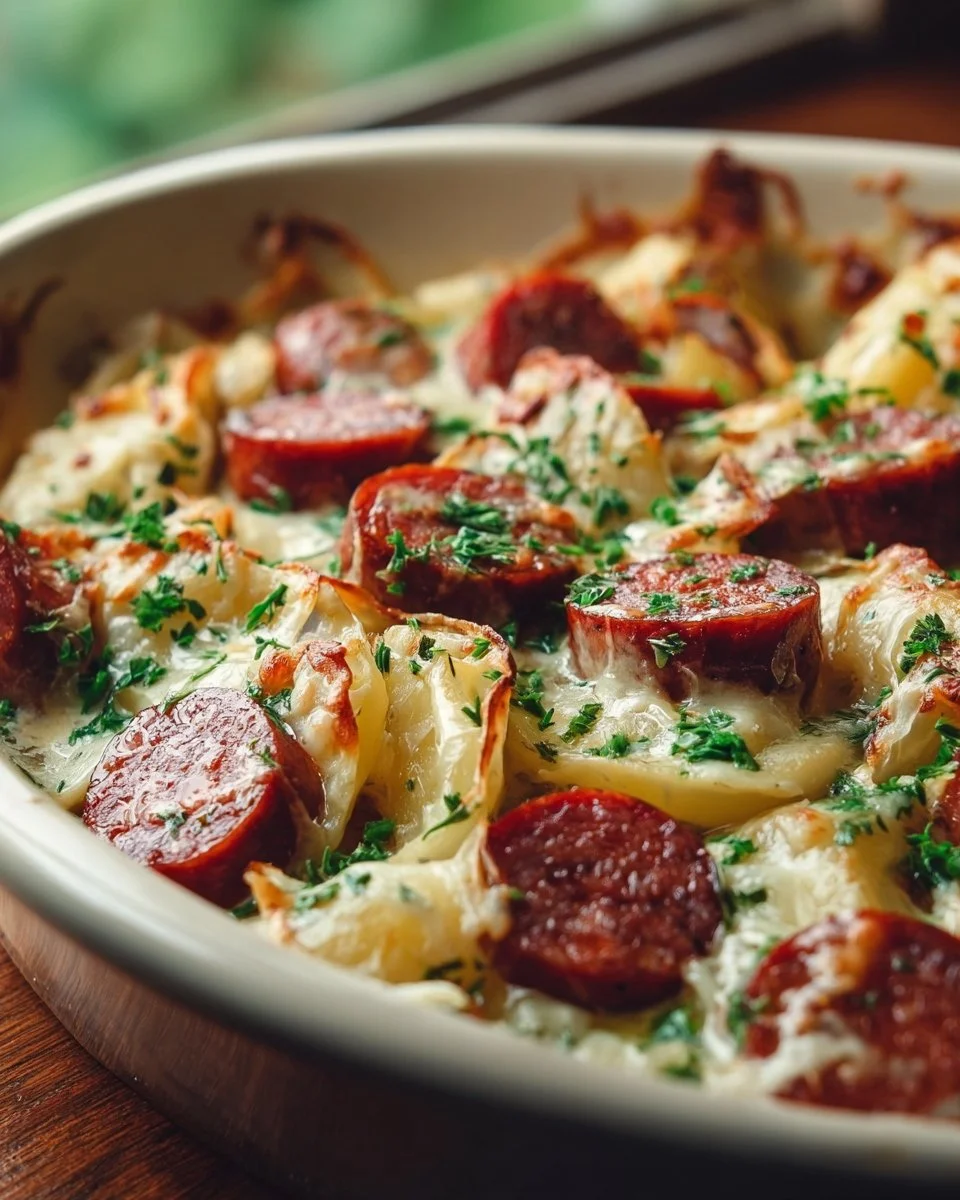
I first stumbled on this Kielbasa and Pierogi Bake on a rainy afternoon when I needed something fast, warm, and utterly comforting. The smell of caramelizing onions and browned kielbasa filled my kitchen and felt like a hug in food form. I remember lifting the foil and seeing the golden pierogi edges crisped to perfection, the cheese bubbling in the pockets, and a family of four circling the table with plates steaming.
This recipe became a weeknight staple because it is straightforward, forgiving, and fills the house with cozy, savory aromas. If you like hearty casseroles, you might also enjoy my take on a gnocchi bake with pepperoni and mozzarella which shares the same family-friendly spirit.
Why make This Recipe
Kielbasa and Pierogi Bake brings together two beloved comfort items: smoky kielbasa and pillowy pierogi. It is:
- Quick to assemble for busy nights.
- Family-approved and kid-friendly.
- Packed with savory flavor and a satisfying texture contrast between crisped pierogi edges and tender centers.
The Secret Behind This Delicious Recipe
The magic is simple: searing the kielbasa concentrates its flavor, while a light coating of oil on the pierogi helps them brown and crisp in the oven. A sprinkling of cheese melts into pockets, creating irresistible bites.
Ingredients You’ll Need
For the Bake
- 1 pound frozen potato pierogi (about 12 to 16 pieces), thawed slightly so they are separated
- 1 pound kielbasa sausage, sliced into 1/2-inch coins
- 1 medium yellow onion, thinly sliced
- 2 cups shredded sharp cheddar cheese
- 1 tablespoon olive oil
- 1 tablespoon butter
- 2 tablespoons sour cream (optional, for creaminess)
- 2 tablespoons chopped fresh parsley, for garnish
- Salt and freshly ground black pepper to taste
Notes on quality and substitutions
- Use good-quality kielbasa for best flavor; smoked kielbasa is ideal. For lower sodium, choose a reduced-sodium sausage.
- Frozen pierogi: potato and cheese pierogi are classic here. For vegetarian option, use vegetarian kielbasa or omit the meat and add mushrooms.
- Swap cheddar for a blend of mozzarella and monterey jack if you want extra stretch and milder flavor.

How to make Kielbasa and Pierogi Bake
Step 1: Preheat and prepare
- Preheat the oven to 400°F (200°C).
- Lightly grease a 9×13-inch baking dish with butter or oil.
Step 2: Brown the kielbasa and onions (about 8 to 10 minutes)
- Heat a large skillet over medium-high heat. Add the olive oil and butter.
- Add sliced kielbasa and cook until edges are nicely browned and a bit crisp, about 4 to 5 minutes. Remove kielbasa to a plate.
- In the same skillet, add the sliced onion and cook until translucent and slightly caramelized, about 4 to 5 minutes. Season with a pinch of salt and pepper.
Step 3: Assemble the bake (5 minutes)
- Arrange the pierogi in a single layer in the prepared baking dish. If they are crowded, overlap slightly; a snug fit is fine.
- Scatter the browned kielbasa and onions evenly over the pierogi.
- Dollop the sour cream in small spoonfuls across the top if using; this adds a creamy finish.
- Sprinkle shredded cheddar evenly over the dish.
Step 4: Bake until bubbly and golden (20 to 25 minutes)
- Cover loosely with foil and bake for 12 minutes to allow the dish to heat through.
- Remove foil and bake an additional 8 to 13 minutes, or until cheese is bubbly and the edges of the pierogi are turning golden and crisp.
- Visual cue: cheese should be melted and slightly browned in spots; pierogi edges should show a light golden crust.
Step 5: Finish and serve (2 minutes)
- Remove from oven and let rest 3 to 5 minutes. Sprinkle with chopped parsley and an extra grind of black pepper.
- Serve warm.
Tips & Recipe Variations
- Use a cast iron skillet: assemble and bake in a 10-inch cast iron skillet for extra crisp edges and easy stove-to-oven cooking.
- Avoid sogginess: do not add extra liquid. Thaw pierogi just enough to separate pieces so they do not release excess water.
- Make it vegetarian: substitute the kielbasa with smoked tofu slices or a medley of sautéed mushrooms and bell peppers.
- Gluten-free option: use gluten-free pierogi or make pillow-style gnocchi as a substitute.
- Cheese choices: swap half the cheddar for smoked gouda for a deeper, smoky note.
- Leftovers: cool completely, cover, and refrigerate up to 3 days. Reheat in a 350°F oven until warmed through, about 12 to 15 minutes, to restore crispness.
- Freezing: assemble but do not bake, wrap tightly, and freeze up to 2 months. Thaw overnight in refrigerator before baking.
How to Serve
Best Ways to Serve
- Serve with a simple side salad of crisp greens and a tangy vinaigrette to cut the richness.
- Offer sour cream, chopped chives, or a swirl of mustard for guests to customize their plates.
- Drinks: a crisp lager, light red wine, or sparkling water with lemon pairs nicely.
Presentation tip
- Spoon the bake into shallow bowls so the browned pierogi edges are visible and each portion gets a mix of kielbasa, cheese, and onions.
Nutrition note
- Serving size: serves 4 to 6 depending on appetite. Calories vary by kielbasa and pierogi choices; for lighter options, use low-fat cheese and turkey kielbasa.
Frequently Asked Questions
Q: Can I make this recipe ahead of time?
A: Yes. Assemble the dish, cover tightly, and refrigerate for up to 24 hours. Bake from chilled, adding a few extra minutes to the baking time.
Q: Can I freeze the leftovers?
A: Baked leftovers can be frozen in airtight containers for up to 2 months. Reheat in the oven from thawed for best texture.
Q: What can I use instead of kielbasa?
A: Try turkey kielbasa, smoked sausage, or for a vegetarian swap use smoked tofu or seasoned mushrooms.
Q: How do I prevent the dish from becoming watery?
A: Avoid over-thawing frozen pierogi. Bake covered for a short time, then uncover to crisp. Do not add additional liquids.
Q: Can this be made dairy-free?
A: Yes. Use dairy-free cheese and omit sour cream or use a plant-based alternative.
Review
“This bake is now my go-to for busy nights. The pierogi get perfectly crisp at the edges while the kielbasa adds such a smoky punch. My kids said it tasted like a warm hug. Leftovers heated up just as well the next day.” – A happy home cook
Conclusion
This Kielbasa and Pierogi Bake is a simple, satisfying dish that turns pantry staples into a cozy family meal. It is forgiving, quick to put together, and full of comforting textures and flavors that bring people to the table. If you enjoy sheet-pan style meals with minimal cleanup, you might find additional inspiration from this Kielbasa and Pierogies Sheet Pan Meal {one pan dinner}. Give the recipe a try, and please share how yours turned out or any tweaks you made.

Kielbasa and Pierogi Bake
Ingredients
Method
- Preheat the oven to 400°F (200°C). Lightly grease a 9x13-inch baking dish with butter or oil.
- Heat a large skillet over medium-high heat. Add the olive oil and butter.
- Add sliced kielbasa and cook until edges are nicely browned and a bit crisp, about 4 to 5 minutes. Remove kielbasa to a plate.
- In the same skillet, add the sliced onion and cook until translucent and slightly caramelized, about 4 to 5 minutes. Season with a pinch of salt and pepper.
- Arrange the pierogi in a single layer in the prepared baking dish. If they are crowded, overlap slightly; a snug fit is fine.
- Scatter the browned kielbasa and onions evenly over the pierogi.
- Dollop the sour cream in small spoonfuls across the top if using.
- Sprinkle shredded cheddar evenly over the dish.
- Cover loosely with foil and bake for 12 minutes to allow the dish to heat through.
- Remove foil and bake an additional 8 to 13 minutes, or until cheese is bubbly and the edges of the pierogi are turning golden and crisp.
- Remove from oven and let rest for 3 to 5 minutes. Sprinkle with chopped parsley and an extra grind of black pepper.
- Serve warm.
Notes
- Easy Lasagna Soup Recipe | Quick & Hearty 40-Minute Meal - January 13, 2026
- Authentic Greek Moussaka - January 5, 2026
- Strawberry Heaven on Earth Cake - January 4, 2026