Crispy Pickle Potatoes
Introduction
I remember the first time I tossed sliced potatoes with chopped dill pickles and baked them until impossibly crisp. It was a rainy afternoon, the house smelling of oven-warmed starch and bright vinegar, and my kids gathered in the kitchen, drawn by that tangy, salty aroma. I scooped a warm wedge, dipped it into a cool herbed yogurt, and the crunchy-hot and creamy-cool contrast felt like a tiny celebration.
This recipe became a staple because it turns humble ingredients into something playful and addictive. The potatoes roast up golden and crunchy on the edges while the pickle pieces add tiny bursts of vinegar and crunch. The herbed yogurt softens the tang and ties everything together with fresh herbs and lemon. If you love snacks with texture and flavor, these are for you. If you like a richer pairing, try this creamy option: creamy Alfredo pasta pairing for a surprising dinner combo.
What Makes This Recipe Special
This dish balances crisp, salty potatoes and punchy pickle flavor with a cooling, herb-laced yogurt dip. It’s:
- Family-approved and quick to prep.
- Versatile for weeknight dinners, snack boards, or game-day spreads.
- Easier on calories than deep-fried alternatives, while still delivering that satisfying crunch.
You’ll love it for the contrast of textures and the bright, savory notes that keep people coming back for “just one more.”
Ingredients You’ll Need
For the Potatoes
- 2 pounds Yukon Gold or red potatoes, washed and cut into 1/2-inch wedges (firm, waxy potatoes hold their shape best)
- 2 tablespoons olive oil (extra-virgin for flavor)
- 1 teaspoon kosher salt
- 1/2 teaspoon black pepper
- 1 teaspoon smoked paprika (or sweet paprika)
For the Pickle Coating
- 3/4 cup dill pickles, finely chopped (use crunchy, not overly brined)
- 2 tablespoons pickle juice (from the jar) to boost tang
- 2 tablespoons panko breadcrumbs (for extra crunch; gluten-free panko works too)
For the Herbed Yogurt Dip
- 1 cup plain Greek yogurt (full-fat or 2% for creaminess)
- 1 tablespoon fresh dill, finely chopped (or 1 teaspoon dried dill)
- 1 tablespoon chives, chopped
- 1 teaspoon lemon zest
- 1 tablespoon lemon juice
- 1/4 teaspoon garlic powder
- Salt and pepper to taste
Notes: If you prefer less vinegar bite, rinse the chopped pickles briefly and pat dry. For dairy-free, substitute a thick coconut yogurt and add extra lemon for tang.
How to make Crispy Pickle Potatoes with Herbed Yogurt for Flavor Lovers
Step 1: Preheat and prep
– Preheat the oven to 425°F (220°C). Line a baking sheet with parchment or a silicone mat. Pat potato wedges dry with paper towels so they crisp.
Step 2: Toss with oil and seasoning
– In a large bowl, toss the potato wedges with olive oil, salt, pepper, and smoked paprika until evenly coated.
Step 3: First roast
– Spread the potatoes in a single layer on the sheet, cut-side down if possible. Roast for 20 minutes. You should see the edges turning golden and the surface starting to blister.
Step 4: Prepare pickle mix and panko
– While potatoes roast, combine chopped pickles, pickle juice, and panko in a small bowl. The panko will absorb a bit of pickle juice for crisp texture and tang.
Step 5: Add pickle topping and finish roasting
– Remove the baking sheet, sprinkle the pickle-panko mixture over the potatoes, gently turning wedges to coat where possible. Roast another 10-12 minutes until the potatoes are deep golden and panko is toasty. Visual cue: panko should be browned and potatoes should be easily pierced with a fork but still hold shape.
Step 6: Make the herbed yogurt
– While potatoes finish, mix Greek yogurt, dill, chives, lemon zest, lemon juice, garlic powder, and salt and pepper. Taste and adjust seasoning. The dip should be bright and slightly tangy.
Step 7: Serve
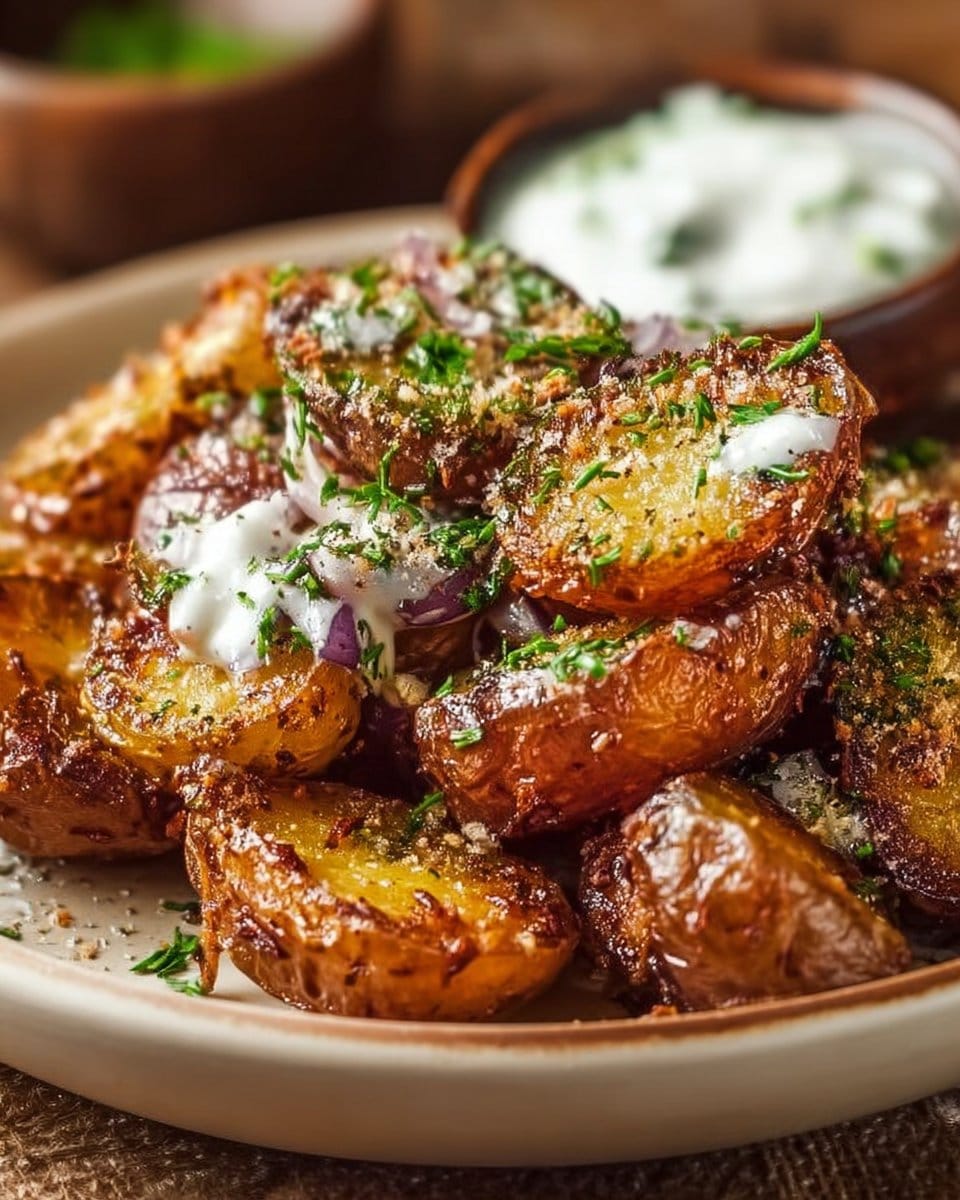
– Transfer potatoes to a platter, dollop or serve the herbed yogurt on the side for dipping. Garnish with extra dill or a light squeeze of lemon.
Timing summary: about 35-40 minutes total active + oven time. The key visual cues are golden-brown potato edges, toasted panko, and a creamy, glossy yogurt dip.
Tips & Recipe Variations
- Use a high temperature (425°F) and give potatoes space on the pan to encourage browning instead of steaming.
- Pat potatoes dry before tossing with oil to improve crispiness.
- For extra crunch, finish under the broiler for 1-2 minutes watching closely.
- To make these gluten-free, swap panko for crushed gluten-free cereal or almond meal.
- For a vegan version, use plant-based yogurt and a neutral oil; replace panko with crushed nuts for texture.
- Add a smoky twist by sprinkling a pinch of cayenne or chipotle powder to the pickle mix.
- Make ahead: Roast potatoes without the pickle-panko topping, cool, and store in the fridge up to 2 days. Reheat in a hot oven and add the pickle topping before the last 8-10 minutes.
- Storage: Keep leftovers in an airtight container for up to 3 days. Re-crisp in a 400°F oven for 8-10 minutes rather than microwaving.
How to Serve
- Pair with grilled proteins, a crisp green salad, or a rich pasta for contrast.
- For a sharing board, serve alongside pickled vegetables, sliced sausages, and bread.
- Plating tip: stack wedges slightly overlapping and spoon the herbed yogurt in a small bowl in the center. Sprinkle fresh dill and lemon zest for color.
- Estimate: serves 4 as a side or 2-3 as a hearty snack; roughly 250-350 calories per serving depending on oil and yogurt choices.
Common Questions
Q: Can I make this recipe ahead of time?
A: Yes. Roast potatoes without the pickle-panko topping up to 2 days ahead. Reheat in a hot oven and add the pickle topping during the last 8-10 minutes.
Q: Can I freeze leftovers?
A: Freezing is not ideal because the texture changes. If you must, flash-freeze on a tray, then store in a bag for up to 1 month. Reheat in the oven; texture will be softer.
Q: What can I use instead of dill pickles?
A: Try bread-and-butter pickles for a sweeter note, or capers for briny bursts. Reduce added sugar if using sweet pickles.
Q: How do I prevent the dish from becoming watery?
A: Pat pickles dry if they are very wet and use panko that will absorb moisture. Also avoid overcrowding the baking sheet.
Q: Can I make this vegetarian or dairy-free?
A: The base recipe is vegetarian. For dairy-free, swap yogurt for a thick plant-based alternative and add extra lemon for tang.
“This was a revelation at our weekend party. Crunchy, tangy, and perfectly balanced with the herbed yogurt. Guests kept asking for the recipe.” – Emma R., home cook
Conclusion
Thanks for reading and trying this playful take on roasted potatoes. I love how a few chopped pickles and a bright yogurt transform ordinary spuds into something memorable. If you enjoy vegetables with crisp textures and bold flavor, you might also like these Crispy roasted veg flatbreads – by Heather Taylor for another easy, flavorful idea to add to your rotation.
I can’t wait to hear how your batch turned out. Share your photos or swaps and tell me which variation became your favorite.

Crispy Pickle Potatoes with Herbed Yogurt
Ingredients
Method
- Preheat the oven to 425°F (220°C). Line a baking sheet with parchment or a silicone mat.
- Pat potato wedges dry with paper towels to improve crispiness.
- In a large bowl, toss the potato wedges with olive oil, salt, pepper, and smoked paprika until evenly coated.
- Spread the potatoes in a single layer on the sheet, cut-side down if possible. Roast for 20 minutes.
- You should see the edges turning golden and the surface starting to blister.
- While potatoes roast, combine chopped pickles, pickle juice, and panko in a small bowl.
- The panko will absorb a bit of pickle juice for the crisp texture and tang.
- Remove the baking sheet, sprinkle the pickle-panko mixture over the potatoes, gently turning wedges to coat where possible.
- Roast another 10-12 minutes until the potatoes are deep golden and panko is toasty.
- Visual cue: panko should be browned and potatoes should be easily pierced with a fork but still hold shape.
- While potatoes finish, mix Greek yogurt, dill, chives, lemon zest, lemon juice, garlic powder, salt, and pepper.
- Taste and adjust seasoning. The dip should be bright and slightly tangy.
- Transfer potatoes to a platter, dollop or serve the herbed yogurt on the side for dipping.
- Garnish with extra dill or a light squeeze of lemon.
Notes

- Vegan Love Letter Pastries: Flaky Strawberry Jam Envelopes - January 16, 2026
- Beefy American Goulash - January 13, 2026
- Authentic Tom Kha Gai Soup Recipe - January 11, 2026