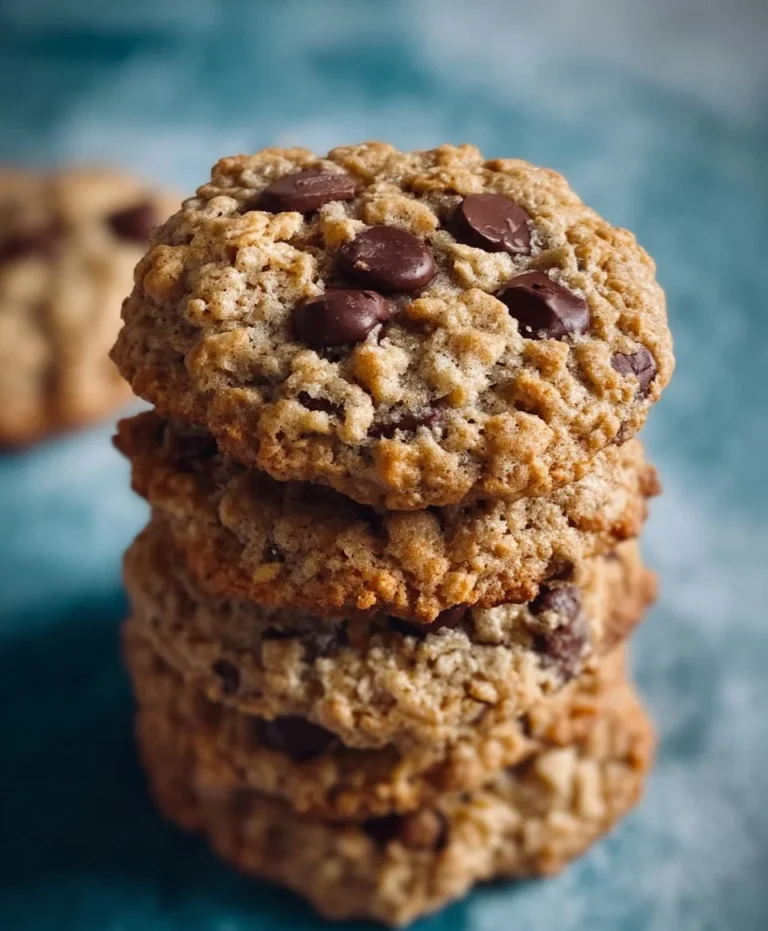
Chewy Brownie Cookies
Brownie Cookies
There’s a special corner in my kitchen that comes alive with delightful aromas and warm memories. It was during a chilly winter afternoon when I first experimented with the idea of Brownie Cookies. As the rain pattered against the window, I felt an overwhelming urge to blend two of my favorite treats: the fudgy richness of brownies and the chewy delightful nature of cookies. Each bite transports me back to those cozy days spent baking with my family, laughter echoing around us, and the scent of chocolate wafting through the air. This recipe has since become a cherished tradition, bringing smiles to friends and family during gatherings and quiet evenings alike. The combination of a brownie’s depth and a cookie’s crisp edge makes these bites a little piece of heaven, and I can’t wait to share them with you!
Why Make This Recipe
These Brownie Cookies are truly special for several reasons. They offer a delightful way to enjoy the beloved flavors of brownies in a portable cookie format. They’re perfect for quick treats, packed lunches, or a comforting snack after a long day. Plus, who can resist that rich, fudgy texture combined with a bit of chewiness? It’s quick to make, incredibly satisfying, and, let’s be honest, a family favorite that everyone approves of. You’ll love how simple it is to whip up a batch and how they disappear just as quickly!
Ingredients Section
For the Cookies
- 1 cup (200g) granulated sugar
- 1/2 cup (100g) packed brown sugar
- 1/2 cup (120ml) vegetable oil (or melted coconut oil for a hint of coconut flavor)
- 2 large eggs at room temperature
- 1 teaspoon vanilla extract
- 1 cup (125g) all-purpose flour
- 1/2 cup (45g) unsweetened cocoa powder (use Dutch-processed for a richer flavor)
- 1/4 teaspoon salt
- 1/2 teaspoon baking powder
- 1 cup (175g) semi-sweet chocolate chips (opt for high-quality chocolate for better flavor)
Optional Add-ins
- 1/2 cup (60g) chopped nuts (like walnuts or pecans for added crunch)
- Sprinkle of sea salt for topping (optional, but recommended for a gourmet touch)
Instructions Section (Step-by-Step)
Step 1: Preheat the Oven
Preheat your oven to 350°F (175°C). Line a baking sheet with parchment paper. This will ensure your cookies don’t stick and come off easily.
Step 2: Mix Wet Ingredients
In a mixing bowl, combine the granulated sugar, brown sugar, and oil. Whisk them together until well blended, about 1-2 minutes. Then, add in the eggs and vanilla extract. Continue whisking until the mixture is smooth and creamy, with a glossy appearance.
Step 3: Combine Dry Ingredients
In another bowl, whisk together the flour, cocoa powder, salt, and baking powder. This will help distribute the leavening agent evenly throughout the mixture.
Step 4: Combine Wet and Dry Mixtures
Gradually add the dry ingredients to the wet mixture, stirring gently with a spatula or wooden spoon until you see no lumps. Make sure not to overmix; we want to keep that soft texture for our cookies!
Step 5: Add Chocolate Chips
Fold in the chocolate chips (and chopped nuts if using). The dough should be thick and gooey, almost like brownie batter.
Step 6: Form the Cookies
Using a cookie scoop or tablespoon, drop heaping spoonfuls of the dough onto your prepared baking sheet, leaving about 2 inches of space between each one.
Step 7: Bake
Bake in your preheated oven for 10-12 minutes. The edges should appear set, while the centers will look slightly underbaked. Don’t worry; they’ll firm up as they cool.
Step 8: Cool
Remove the baking sheet from the oven and let the cookies cool on the sheet for about 5 minutes before transferring them to a wire rack. They’ll develop a lovely chewy texture once they cool.
Pro Tips and Variations
- Let Cool: Allowing the cookies to cool properly enhances their texture and flavor.
- Chill the Dough: For thicker cookies, refrigerate the dough for about 30 minutes before baking.
- Flavor Variations: Consider adding mint extract or a mix of dark and white chocolate chips for a unique twist.
- Gluten-Free Option: Substitute the all-purpose flour with a gluten-free blend.
- Nut-Free: Simply omit any nuts to make these suitable for nut-free diets.
- Storage: Store cookies in an airtight container at room temperature for up to 5 days, or freeze them for up to 3 months.
Serving Suggestions
Serve these luscious Brownie Cookies with a tall glass of cold milk or a steaming cup of coffee for the perfect pairing. For a delightful presentation, dust with powdered sugar and serve them on a beautiful platter. They also pair wonderfully with a scoop of vanilla ice cream piled on top for an indulgent dessert.
FAQ Section
Can I make this recipe ahead of time?
Yes! You can prepare the dough ahead and refrigerate it for up to 2 days before baking.
Can I freeze the leftovers?
Absolutely. These cookies freeze well. Just be sure to store them in an airtight container or freezer bag.
What can I use instead of vegetable oil?
You can substitute vegetable oil with melted coconut oil or even unsweetened applesauce for a healthier option.
How do I prevent the cookies from becoming too hard?
Be careful not to overbake them; the centers should look slightly undercooked when you remove them from the oven, as they will continue to firm up as they cool.
Can I make this vegetarian or dairy-free?
Yes, use dairy-free chocolate chips and ensure your other ingredients are also dairy-free.
Conclusion
Baking Brownie Cookies is a joy that not only fills your home with delicious aromas but also nourishes the heart and soul. Each bite combines the nostalgia of childhood memories with the pleasure of sharing delightful treats with loved ones. I hope you embrace this recipe, bringing warmth and sweetness to your own kitchen. Try it out, share your results, and let’s create more sweet memories together! Happy baking!

Brownie Cookies
Ingredients
Method
- Preheat your oven to 350°F (175°C). Line a baking sheet with parchment paper.
- In a mixing bowl, combine the granulated sugar, brown sugar, and oil. Whisk until well blended, about 1-2 minutes. Add in the eggs and vanilla extract, continuing to whisk until smooth and creamy.
- In another bowl, whisk together the flour, cocoa powder, salt, and baking powder.
- Gradually add the dry ingredients to the wet mixture, stirring gently until the dough is thick and gooey.
- Fold in the chocolate chips and any chopped nuts if using.
- Using a cookie scoop or tablespoon, drop heaping spoonfuls of dough onto the prepared baking sheet, leaving about 2 inches of space between each one.
- Bake in the preheated oven for 10-12 minutes. The edges should appear set, while the centers will look slightly underbaked.
- Remove the baking sheet from the oven and let the cookies cool on the sheet for about 5 minutes before transferring them to a wire rack.
Notes
- Hearty Hobo Casserole - January 13, 2026
- Classic Avgolemono (Greek Egg and Lemon Soup) - January 11, 2026
- Moist Chocolate Peanut Butter Poke Cake - January 4, 2026